


 Reply With Quote
Nice job, looks great.
Keen to see some more photos but further back of the whole car.


 Volkswagen Fan


Hey all,
So i thought it would be a good idea to put up a D.I.Y of my Cupra front lip install on my MKV R32 as ive been told no one else has actually done this yet, that i know of.
What you will need.
Car jack stands
Car jack, not the VW one
Star allen keys for the under bumper lip removal
Screw drivers
3/16 screws x8
3/16 bolts x8
3/16 rubber washers x8
Drill
Hand saw
Heat Gun(if you choose to mould the lip)
1-2 mates
Step 1
Get the car off the ground and jack it up onto the arms under the car using the car stands on each side.
Step 2
Get the hand saw and start to cut back the 2 centre clips as these 2 clips are much too high. So cut them back to almost flush with the rest of the lip and give them a bit of an angle on the back of them as this will make it fit more flush on the bumper. Once they are cut use some sand paper to smooth these cuts out. Once that is done test fit it on the bumper again and if it needs adjustment do it again.
Step 3
Now drill the holes into your lip. Once this is done get a permanent marker and mark 8 points of where you are going to drill for the screws on the bumper, you will need to people who can hold the lip in position while you do this. I made my screw points on the 1st clip from the wheel arches, the 5th clip and the 2 closest clips to the front of the lip, respective on each side of the lip to the centre.
Step 4
Once you have the points marked you then need to get under the bumper to access the rubber panelling between the back underside of the bumper and the under engine covering. you need to remove all 8 star screws and then unclip and remove this.
Step 5
Now drill you holes either 6-8 points depending how high you want the lip to sit into the bumper with your drill. Once this is done start screwing some screws in to get it sitting right and to make sure it sits right. Then you will need to access under the rear of the bumper so you can put the washers and bolts in so it stays on nice and tight. Once this is done you just need to reinstall your under bumper covering and take the car back down to earth. Easy job takes about 1.5 hours or so, but its worth doing it right.
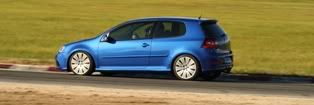
The finished product

Volkswagen Enthusiast
Nice job, looks great.
Keen to see some more photos but further back of the whole car.
White Scirocco R
White MK3 Golf 2dr
White Caddy (Work Van)
Volkswagen Fan

Yea ill get some up, was dumping rain so didnt want to get soaked
Volkswagen Fan
Great write up mate. Looks good. Looking forward to seeing some pics of the whole car.
2009 .:R32 5Door Black Magic DSG Sunroof Stubby Antenna
2007 Honda CBR1000RR Fireblade Yoshimura RS5 Carbon Fibre Pipe
Volkswagen Fan
Great write-up mate, looks great
'16 Golf R Wolfburg Edition Wagon | Limestone Grey
'09 Passat R36 Wagon | Candy White
'06 Jetta TFSI | Campagnella White | DSG | Anthracite Leather | Sunroof | BT
MODS | Neuspeed Springs | 19" Omanyt | Votex Front Lip | K&N Filter | RCD510
Volkswagen Fan
arghhh beat me to it - great job and write up!
Did you need to remove the under carriage protector to make this fit?
.:R32 | GIAC | HALDEX II | MILLTEK | BMC | WHITELINE | A-ROTORS | HAWK
Volkswagen Fan
Awesome write up. I would get some of that black plastic polish to give it that semi shiny finish to match your VW badge. Love the black badge with the chrome strips. Havent seen that before. Very nice.
Volkswagen Fan
Yea Nathan, step 4-5 is where you will need to pull that under carriage off, this is where it makes it easier to do the bolts up nice and tight. I tired to pm you back letting you know i was doing it last night, but your inbox is full.
Volkswagen Fan
09 MKV R32> Haldex 2> ECS Tuning Delete> Cupra R Lip> Blacked Out> Gallardo Black Wheels> Tow Hook> Black Badging>RCD510
Volkswagen Enthusiast
It looks great but my car already scrapes on concrete park stops. I nearly lost the whole front end once when reversing. Is your R32 lowered?
Volvo S60 RD T6
 Posting Permissions


Bookmarks